Wednesday, October 24, 2012

Darling DIY: Button-Down to Skirt

 We LOVE commandeering our dad's old things! Last week, we made these bracelets out of his ties. Here is our latest attempt with the sewing machine: we turned his old button-down shirts into a cute little skirt. It actually required just a simple straight stitch on the sewing machine. The special supply with thick elastic for the waist band. We were pleasantly surprise at how it turned out. Here's the little secret: the waist band is a little messy, but pair it with a wide belt and VOILA! no one will ever know you're just an amateur on the sewing machine.

Supplies: Button-down shirt, elastic, needle/thread or sewing machine, measure tape.

Steps: 1) Lay the shirt out flat and cut a straight line across at the armpits (you're cutting the top and the sleeves off); 2) Measure your waist and cut a piece of elastic to that size; 3) Lay the fully stretched out piece of elastic across the top (make sure the shirt is unbuttoned and laying open and flat) and pin the elastic down; 4) Sew two seams (one on the top edge of the elastic and one on the bottom) to attach the elastic; 5) Button your (now) skirt and put it on; 6) Show off your awesome DIY skirt! 


Tuesday, October 23, 2012

Dazzling Destination: Fall Foliage

A little post about our quick trip to the park to enjoy the GORGEOUS colors of fall! We very highly recommend heading to your local park with a hot pumpkin spice latte, a cozy sweater, and the people you love for a magical experience. The colors of the leaves are breathtaking, not to mention the crinkled leaves under your feet. It'll be a refreshing break from a hectic day. 


Dishy Delights: Strawberry Cheesecake Pudding Pops

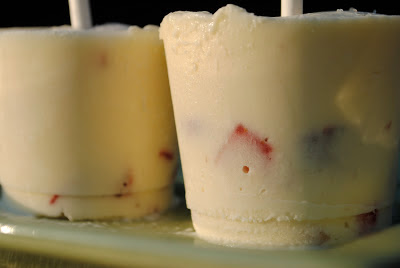
We always crave something cold and sweet during the lingering warm days from summer. We were having a particularly bad bout of cravings when we rummaged through our pantry. We founds some ingredients and made these strawberry cheesecake pudding pops! And my, were they delicious! You can make the pudding pop base with any flavor of instant pudding and then add in whatever mix-ins you have laying around in your kitchen! Next up is something chocolate-y....yum! 

Ingredients: 1 package instant cheesecake pudding mix, 1 tub of cool whip/whipped topping (we used fat-free, making this dessert almost NON-fat!), fresh strawberries, plastic cups, cookie sticks

Steps: 1) Let the cool whip thaw for a few mins until its soft; 2) Mix pudding mix into cool whip until thick and blended; 3) Mix in chopped strawberries; 4) Pour into cups, add sticks and freeze (if the sticks fall over, freeze for a few mins (about 10) and then add them); 5) ENJOY!

(Makes 4 HUGE and very solid pops)


Darling DIY: Homemade Stamp Shirt

We saw this technique on line, and we just had to try it! It turned out quirky, graphic, and fun! Your graphic print shirt is a GREAT and unique staple to have in your wardrobe. You can wear it alone or pair it with a cute colorful cardigan or even wear it under a summer dress so just the printed sleeves peek out- so many possibilities! And you can really make it your own: the print, the color... Don't worry about imperfections, that's what makes it so whimsical and cool! 

Supplies: plain shirt (a light color works best), acrylic paint, a paint brush, craft foam, exacto knife, newspaper, and LOTS AND LOTS of napkins (this one gets dirty!).

Steps: 1) Pick out a silhouette design you want to do (we picked this simple camera); 2) Print or draw on a piece of paper and cut it out with the exacto; 3) Trace your stencil onto the craft foam and cut out your stamp; 4) Paint the stamp and press on to the shirt ***MAKE SURE YOU PUT NEWSPAPER BETWEEN THE LAYERS OF THE SHIRT!***(repeat, repeat, repeat until your shirt is covered);  5) Touch up your edges; 6) Wear and proudly show off your creation! 


`~Cute polka dots on the back to cover up mistakes from paint seeping through~

Monday, October 22, 2012

Dazzling Destination: Linvilla Orchards

Oh, how we love the fall! The leaves are changing, the weather has a romantic chill (one of our FAVORITE parts of the season), and everyone is just filled with happiness and love. One of our favorite family activities is to go fruit picking! It's such a fun bonding experience and we get to gorge ourselves with delicious fresh fruit. Last weekend, the weather was GORGEOUS and we decided to go on a family outing APPLE PICKING. Apples are one of the fruits that all four of us love, so it was perfect. We went to a local orchard, Linvilla Orchards, that we've been going to for many years. If you live in the Philadelphia area, we definitely recommend taking your family there before the apple picking ends in mid-November. 

Though its a "local" farm, we were speechless at the rows and rows and rows and row (you get the idea) of apples! And mind you, each row has trees and trees and trees, and each tree has apples and apples and apples....yeah. They give you these cute boxes and wagons to carry your bounty in! Our dad is a picking PRO, and while the three ladies were busying munching- he had picked 13 pounds! We had such a good time, and we're still enjoying the delicious, crisp, and juicy apples! 


 ~Our mama was in LOVE! She kept on dreamily saying, "Nature's bounty..." the whole day!~


 ~And the snacking begins...~


 ~A fun contraption for those high-up apples. We turned this into a game/contest of who could get the most!~


~The pro with his large bag!~


Wednesday, October 10, 2012

Darling DIY: Glitter Sole Heels

Aren't these so fun? We found great deal on line- 2 pairs of these cute, thick-heeled black pumps for $12 each! So even though we have a ton of black heels, we couldn't resist! Each of us revamped these shoes into something a little more special (we painted the first pair, remember? if not, they're right here).   We loved the glitter sole which is a very glam detail that will not go un-noticed! All we needed was our own "glitter glue" with was just simple silver craft glitter mixed with liquid glue; we painted the mixture on to the sole (you may need a couple layers, but make sure to let them dry in between coats so you can see the spots you missed)! That's it! 

But, we didn't want to stop there! We attached a small ribbon loop to the backs of the shoes (simple glue again), so we can make an interchangeable ankle strap (we think that ankle straps are SO hot! :-) ). Now our massive ribbon collection can go to use! Again, any color, any style! 

If you're feeling daring and extra fancy, why not paint, glitter, AND strap? Monochromatic details would make your pumps a show-stopper (without looking crazy)! 


Darling DIY: Bauble Necklace

Hello! Today we're bringing you one of our simplest DIYs to date! These bauble necklaces are very on trend this season and can be made in any and every color- you can literally whip one up to wear out that same day! 3 simple supplies: acrylic paint, unfinished wood beads, and some type of string (we used black cord). You can also make it long or shorter depending on the style that you want. We also made a couple in brighter colors (this one is more demure neutrals for an earthy look) which we got a ton of compliments on! It's a cute  and simple statement piece that goes with everything. It's perfect if you want to add some quick style without looking to flashy (we like flash too!). 


Tuesday, October 2, 2012

Darling DIY: Necktie bracelet

Here is another simple accessory DIY! These VERY simple bracelets are made out of our dad's old ties (we think he's a little tired of all of polka dot ties we bought him over the years!). All you have to do is cut your desired length off of the skinnies portion of the tie, glue the ends shut (we used simple fabric glue), and add on a couple of velcro dots to close it around your wrist. That's it! They end up looking like really cute cuffs, and you can do them in so any styles (depending on which ones the guy in your life is willing to part with) and you can even add buttons on top to give it a more complete look. We're gonna convince our dad to give up one of his plaid ties for a prep-inspired bracelet next! 


 ~Our mom wearing dad's tie. HOW ROMANTIC IS THAT?~ 


Darling DIY: Silhouettes


This is one of our favorite home decor DIYs to date! It hits the main points: 1) EASY! 2) CHEAP! and 3) SYLISH! Our room's colors are blue, pink, and green with black accents so this looks fabulous on our wall. And believe us, it really adds an instant pop of style to your wall. The best part: one frame cost us.... $1.20! Yes, you read that correctly $1.20! You can change up the background using almost all flat textiles (including cute fabric) to match your decor! Again, these would be great gifts, too! Here's how we did it:

Supplies: 
-Black 8x10 frame (these are $1 plastic frames from our local dollar store)
-Scrapbook paper (20 cents each!)
-Black paint and brush
-Scissors
-Camera and printer

Steps:
1) Get your model to stand in profile (against a white wall makes it easier to cut)
2) Print out your photo (approximately 6x9)
3) Cut it out  (this is a little time-consuming if you're being really precise, but you totally don't have to)
4) Place cut out page on some wax paper (so you don't destroy your surface when you paint off of the picture), paint, and let it dry. 
5) Cut scrapbook paper to size, glue on silhouette, place in frame and VOILA! 


~Hanging on our wall!~