Sunday, September 30, 2012

Darling DIY: Magazine Pouch


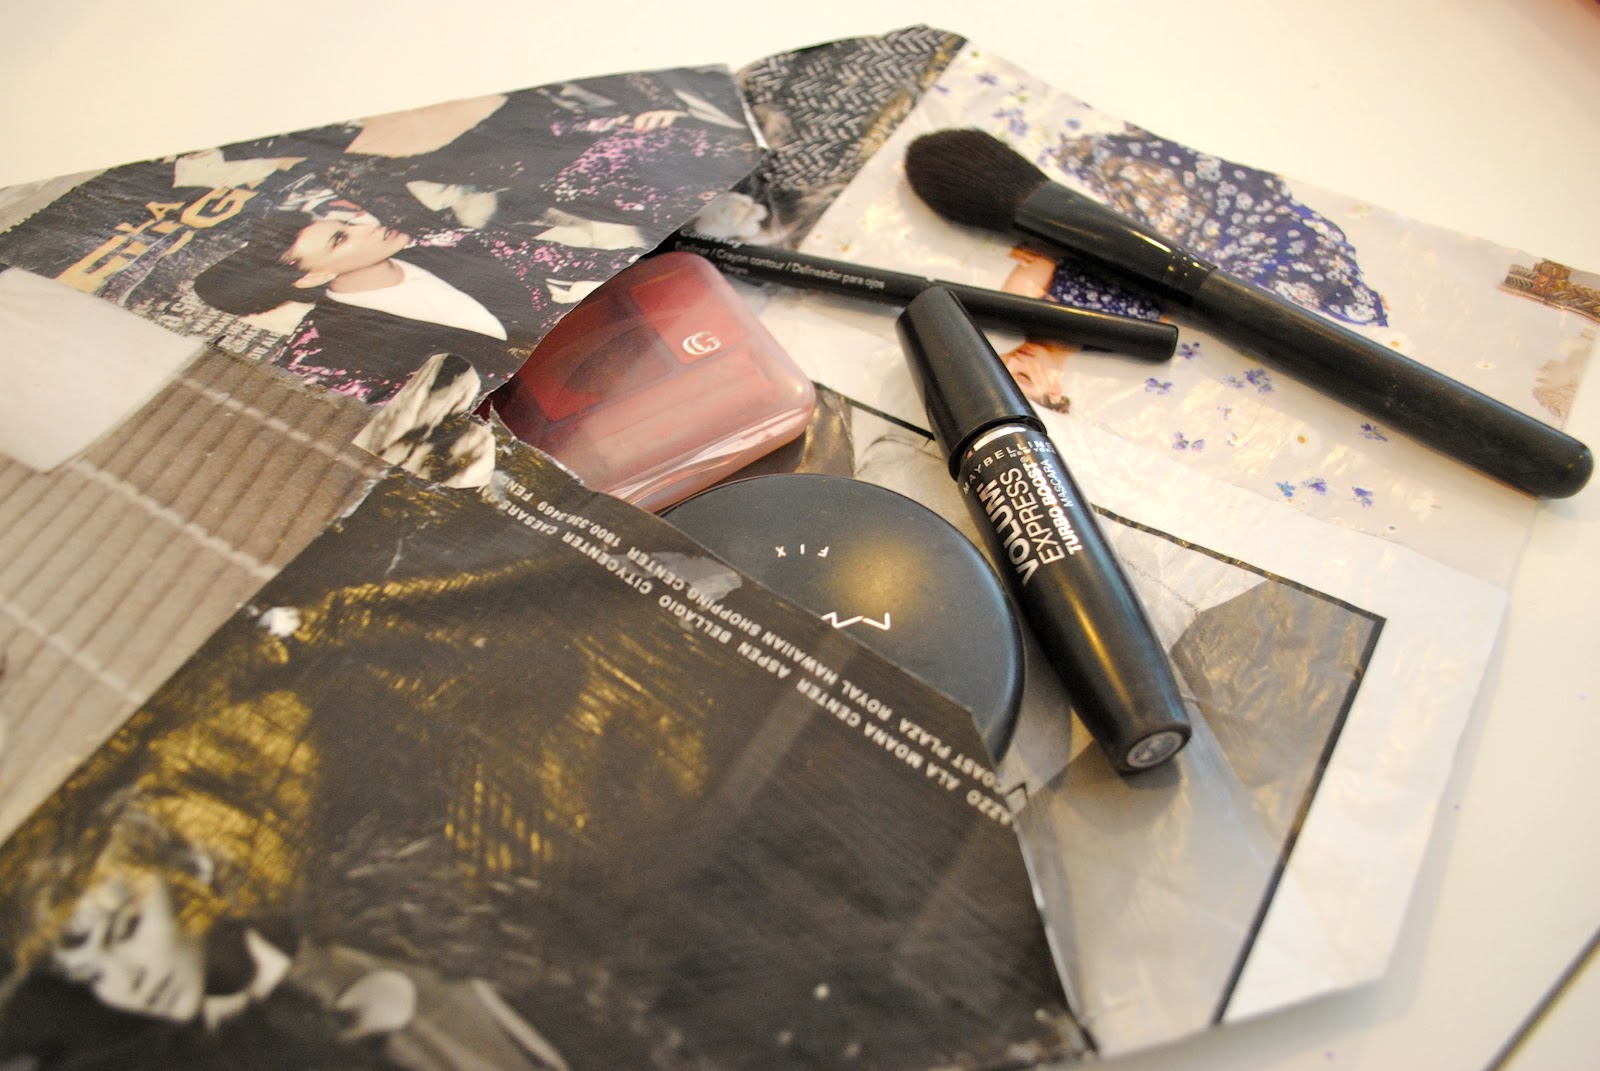
Another fun and easy paper craft! All you need are some old magazines, scissors and some glue. We collected some gorgeous and girly black and white ads from Vogue and got to work to make this cute envelope pouch. All of you have to do is:  1) glue a few pages (we used 4) together to make a large, flat rectangle, 2) cut it into a perfect square, 3) turn it diagonally so it makes a diamond shape,  4) fold three of the edges in to the middle so they are touching and glue down, 5) with the flap on top, cut little triangles off of the sides so the top flap can fold down over the center, 6) add a piece of velcro or a button and you're done! We put on about 2 layers of glue but it's still a little thin. So, we're using it as a make-up pouch! 


Darling DIY: Book Page Jewelry

We LOVE print/text when used as a a textile for accessories (made pretty clear with our book page flats)! Here are two more P&P (what else?!) page accessories: a statement necklace and some earrings. For both, we glued on the book pages to the front and back of cardstock and sealed it with a layer of glue on top. We used hole punchers to make both the heart and the small circle shapes (these are totally doable by hand with a stencil and an old fashioned pair of scissors; it requires patience but can turn out pretty perfect!). The necklace is made from simple jump rings and a chain, and the earrings are just a little silver post. Again, we love this project because it has such a great vintage style AND came be customized with pages from YOUR favorite book. These are absolutely fabulous for a friend or family member and can be customized using pages from their favorite books for a stylish and sentimental gift. 


Wednesday, September 26, 2012

We're on Pinterest!

Hi, everyone! Check out our Pinterest board for a quick look at our favorite projects! 


Also, thank you everyone for all the love and wonderful feedback! 

Stay darling, 
 Sonali & Anika

Tuesday, September 25, 2012

Darling DIY: Craft/Tea Room

Okay, so we have been WAITING to post this! This not-so-little DIY was by far my (Sonali) favorite to make and Anika's favorite to receive. For Anika's 21st birthday last month, I wanted to do something special that she would always remember. She fell in love with Sandra Foster's cottage, which was featured in the NYT (here to readhere for pictures), and we decided to recreate it in our home! I contacted Ms. Foster for some help, and she said that the first thing we should do was to make sure all the surfaces were white. So, we painted our walls and our dad (yes, he made the trips to Homegoods!) bought this beautiful, fully rug to cover up the pink carpet. We then got white furniture (tables and storage cube: Target, chairs: Amazon, chaise: eBay, pillars: Michael's) and some cute embellishments. We had a very clear vision: white and girly, which made shopping much easier. We wanted to stay true to Ms. Foster's spirit and stay within a budget; the best places are Amazon, eBay, and our favorite store, Homegoods!


 ~In all it's glory!~


~The pink chandelier that we've had for years finally has a home~


~Soft and light polka-dotted curtains~


 ~All the supplies are now in their spots!~


~Anika's favorite pilars with a birthday card~


Anika's take: Oh, gosh!!!! This was not expected! We were in NYC this summer so I had NO idea that this was happening back in Paoli, PA. About a week before my birthday, our dad called me to stay that there were bugs in this room and that it was sealed to be fumigated. When I got home, I saw the closed door and didn't think twice about it (I REALLY hate bugs, so I didn't even dare get near it). After our family breakfast, the three of them were sneaking glances at each other and told me go to upstairs into the room. I knew they had done something. When I opened the door, I couldn't even believe it! I literally thought I'd stepped into a dream! I started crying with happiness at how much these three amazing people love me! They told me it was "for my own particular use" (quoting Pride and Prejudice) and dubbed it the "Craft/Tea parlor" (two of my FAVORITE things!).  It was the BEST present I have and will ever get. Since then, I've spent countless hours in the room. Every time I step in it, my heart swells with happiness. My family is really something else. And I'm really the luckiest girl in the world! 

Darling DIY: Painted Pillow

Our pillow obsession continues! This painted chevron pillow is made with a simple white pillow form (from Ikea!) and acrylic paint. The chevron pattern was made my taping the negative space with painters tape  (the design obviously isn't perfect but it's quirky so we like it!)- one simple layer of paint is enough for the bold color. On the back we wrote (again with acrylic paint with a thin tip) a cute quote from, we dare you to guess!, Pride and Prejudice! It takes a some patience because the front takes a little time to dry and it can also be a little messy (make sure you put something on the surface before painting!!). But we love our end product! You can be creative with the design and color (we did another one with lime green polka dots, currently in my dorm room at school)! 


 ~Oh, Mr. Darcy!~


~Our pillow love is not complete without our two favorites! Meet Anika's cocker spaniel, Julien Janvier, and Sonali's unicorn, Louis! Yes, they're french! :-) ~


Sunday, September 16, 2012

Darling DIY: Cake Stand (Part 2..and 3!)

After I made a cake/dessert stand for my roommate for her birthday, I wanted to make a couple more for myself. Again, they are made with a candle holder, a metal plate, some really strong clue, and acrylic pain. The yellow/silver one is made with the acrylic and loose glitter (We applied glue on the stand and rim and sprinkled and shook off the glitter the old-fashioned way. It took a while and We made a little bit of a mess, but it was worth it!). And the black and white one is made with paint and a piece of scrapbook paper that was cut to match the inside of the plate. We sealed them both with a couple of layers of Mod Podge. (***Be careful, we have not tested if these are dishwasher safe! We'd be cautious and if serving food, then just line them with a napkin, doily, or plastic wrap. They are waterproof, so if they get a little dirty, they can be cleaned with a damp towel.) 

Colors and materials can run wild with your imagination and creativity! 


~Our is being used as a jewelry stand!~


Darling DIY: Graphic Pillow (Part 2)

So, you will soon realize that we LOVE LOVE LOVE pillows! We've been dreaming about having our bed filled with colorful throw pillows for so many years, and now we're making the dream a reality. Plus, its such a fun and easy project for amateur sew-ers and crafters like us. And the possibilities are endless! Just like with coasters, you can really let your imagination run wild! You can use so many materials and textiles to make or decorate throw pillows, and you can have them fit ANY visions you have for home decor. They're wonderful. 

We saw a variation of these pillows at a store, and thought they were so cute! So, we decided to make our own for our lovely parents.  They are actually made with old pillow cases (which are cut smaller- so we left 2 of the original seams on and closed the other 2). We used iron-on transfer paper (we'll so happy to say that after YEARS of trying to get a perfect transfer, we've figured it out! All it takes is patience. Make sure you let the hot iron fuse the fabric for more time than less and then SLOWL peel the back off) for the graphic, regular pillow stuffing, and some cute tassels that match our parents bedroom. 

They turned out pretty cute, didn't they? Our parents thought so too. :-)


Dishy Delights: One-Minute Iced Latte

One of our newfound loves is an iced latte from Starbucks! It's so cool and creamy, with a perfect kick of expresso to wake you up at any time of day! We soon realized that paying close to $4 for a good-sized drink a couple times a week wasn't the way we wanted to be going. So, after watching the baristas to see how they make their delicious drink, we came up with this amazing (if we do say so ourselves) and instant gratification providing homemade latte! It takes about a minute (which is so much shorter than waiting for your name to be called at Starbucks):

Ingredients: 

1 1/2 teaspoons instant coffee
 About 1/4 cup water
1 1/2-2 cups milk (any kind you want)
Sweetener (again, any kind you want)
5-6 Ice cubes
(Optional: Half and Half or cream, to taste)

Steps:

1. Mix the coffee into the water and heat in microwave for 30 seconds 
2. Place ice cubes into glass and pour hot "expresso" over them. 
3. Add milk and sweetener
(4. If you like your lattes extra creamy, add in the half and half or cream! 

ENJOY your cold treat! Though the weather is getting cold here, we're sure we'll be making these way into fall! 


~Finally got to use the Sense and Sensibility coasters!~

~It sure makes preparing for a presentation MUCH easier!!~

Wednesday, September 12, 2012

Dishy Delights: Spreads

Hello, everyone! School is officially back on, so here is a quick, short, and sweet post about two spreads we whipped up this summer and we thought tasted great! They're very easy to make and you can serve them with just about anything! Wraps, sandwiches, burgers, or even as a dip with your favorite cracker or chip. Its so simple- perfect for dorm room entertaining for us or even at home as a semi-gourmet twist to  ketchup and mustard (we love those too!). 

Chipotle Mayo:
1/4 cup low (non-fat) mayo
1/4 cup non-fat sour cream
chipotle seasoning to taste (it can get a little spicy so be careful!)

Avocado Ranch:
1/2 cup non-fat sour cream
Ranch dip mix to taste
1 mashed avocado

All you have to do is mix, refrigerate for about 10-15 minutes and enjoy!!